
 The use of sandbags is a simple, but effective, way to prevent or reduce flood water damage. Properly filled and placed, sandbags can act as a barrier to divert moving water around instead of through buildings. Sandbag construction does not guarantee a water-tight seal, but is satisfactory for use in most situations.
Types of Sandbags
The most commonly use bags are untreated burlap sacks available from feed or hardware stores. Empty bags can be stockpiled for emergency use and will be serviceable for several years if properly stored. Filled bags of earth material will deteriorate quickly. Commercial plastic sandbags, made from polypropylene, are also available from most bag suppliers. These will store for a long time with minimum care, but are not biodegradable. Thus, they have to be disposed of, or will remain around for along time. Do not use garbage bags, as they are too slick to stack. Do not use feed sacks, as they are too large to handle. Use bags about 14-18″ wide, and 30-36″ deep.
Types of Filling Material
A heavy bodied or sandy soil is most desirable for filling sandbags, but any usable material at or near the site has definite advantages. Coarse sand could leak out through the weave in the bag. Gravelly or rocky soils are generally poor choices because of their permeability.
 Fill sandbags one-half full. Sand is suggested if readily available, however, sand is not mandatory and soil may be used.
Fold top of sandbag down and rest the bag on its folded top.
Filling Sandbags
Filling Sandbags is a two-person operation. One member of the team places the empty bag between or slightly in front of widespread feet with arms extended. The throat of the bag is folded to form a collar and held with the hands in position. The other team member carefully empties a rounded shovel full of material into the open end. The person holding the sack should be standing with knees slightly flexed and head and face as far away from the action of the shovel as practical. The person shoveling should carefully release the rounded shovel full of soil into the throat of the bag. Haste in this operation can result in undue spillage and added work. The use of safety goggles and gloves is desirable, and sometimes necessary.
Stacking Sandbags
- The number of bags needed for 100 linear feet of dike is:
- 800 bags for 1-foot-high dike
- 2,000 bags for 2-foot-high dike
- 3,400 bags for 3-foot-high dike
Prepare the surface by removing any debris and from the area where bags are to be placed. When possible, provide stability for the sandbags by making a bonding trench, about the depth of 1 sandbag.
Lay plastic sheeting down to help provide a water proof seal. The sheeting should be about 6 mils thick. Lay the plastic sheeting down very loosely. The pressure of the water will then make the plastic conform easily with the sandbag surface. If the plastic is stretched too tightly the water force could puncture it.
Place the l/2-filled bags lengthwise and parallel to the direction of flow. Fold the open end of the unfilled portion of the bag to form a triangle. Place succeeding bags on the folded or fired portion of the previous bag and tamp into place to eliminate voids and form a tight seal. Stagger the joint connections when multiple layers are necessary, much like the pattern of bricks in a wall.
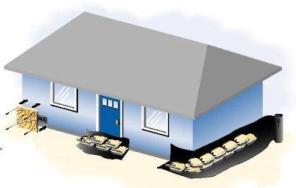
Sandbagging a Building
Sandbags alone should not be relied on to keep water outside a building. Use sheets of plastic tarp with sandbags. Use baffle boards to cover openings, such as windows, doors, and vents.
- Baffle Boards
- Use 3/4″ plywood with a soft gasket material like felt or foam rubber that is at least 2 inches wide. Attach the gasket material with waterproof glue.
- Overlap the window or vent by three or four inches on all sides.
- Use four or more nails, screws or bolts to secure the baffle boards over openings.
- Garage doors should have suitable boards one-inch thick. The bottom edge of the baffle board should be shaped to fit the driveway surface so there will be a watertight seal on the bottom. Use baffles to seal door cracks vertical to and higher than the bottom seal.